
The Brief
We were called to this London property following two historic incidents; an escape of water from the bathroom on the first floor and a burst water mains on the ground floor, which affected the dining room.
The insurance company sent a restoration provider who completed for the first phase of drying in February 2014. However, they found that the floor was still damp so reinstalled the drying equipment for a further four weeks, after which, they issued a drying certificate.
However, when the company who were due to complete reinstatement works attended, they found the floor and walls to still be damp. We understand that the floor was subsequently dug up and a new DPM (damp proof membrane) was installed, followed by the installation of a new floor.
The new DPM and floor solved the damp issues with the floor, however, the walls were still suffering with dampness. We also understood that a contractor appointed by the insurance company suggested that the property was suffering from “inherited rising damp”.
The Objective
The purpose of our visit was to evaluate the moisture levels in the lounge, dining room, and kitchen walls. We were to also clarify whether the property—or parts of it—were indeed suffering from an ongoing damp problem caused by capillary action, or whether the high moisture levels were the result of the escape of water incidents.
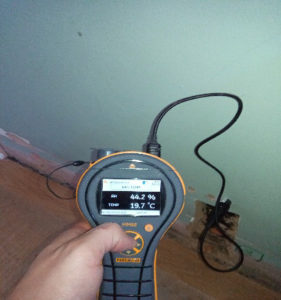
We started our investigation with a moisture survey, which provided us with the WME (wood moisture equivalent) and the REL (relative moisture reading). It also provides us with the atmospheric readings including Relative Humidity, Temperature, and Specific Humidity.
Atmospheric readings help us to evaluate several things, including whether there is a risk of secondary damage to hygroscopic materials (eg. wood and plasterboard) due to high levels of moisture in the air. Hygroscopic materials can absorb water vapour from the air, increasing the amount of water they’re holding at a given time. As such, this can lead to further issues, including microbial (most commonly mould) growth.
At the time of our visit, the atmospheric conditions read as:
| Relative Humidity | Temperature | Dew Point | Specific Humidity | Vapour Pressure |
|---|---|---|---|---|
| 46.6% | 23.1°C | 10.9°C | 8.07g/kg | 1.29kPa |
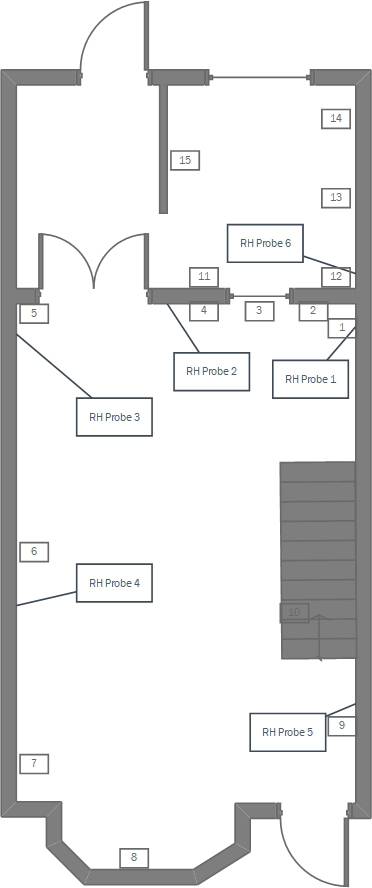
As you can see from the chart below, we recorded very high moisture levels on the walls which have been directly affected by the escapes of water, the walls which are in close vicinity to the mains, and where the water come down into the kitchen following water ingress from the bathroom upstairs. The relative humidity probes located in other walls returned much lower readings.
These results indicate that there is no ongoing damp problem with the walls, even though damp proofing was installed in the form of blackjack and render. The existence of the sand and cement render does not automatically mean that the property is suffering from rising damp; we have seen this installed in many properties above the ground floor with no issues.
In addition to the above, the term ‘rising damp’ describes the movement of moisture upward through permeable building materials, by way of capillary action. It becomes a problem if the moisture penetrates vulnerable materials or finishes, particularly in the occupied parts of a building. This moisture will dissolve soluble salts from the building materials, such as calcium sulphate. It may also carry soluble salts from its source as it travels.
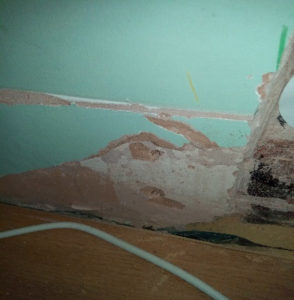
If the moisture evaporates through a permeable surface, these salts will be left behind and form deposits on or within the evaporate surface. Our investigation started by a visual inspection of the walls in the lounge, dining room, and kitchen and we found no signs of salt residue on any of the walls.
Additionally, the brickwork below the window in the wall dividing the kitchen and dining room registered as dry, with readings of 15.5% WME or 190 REL. The plasterboard on the other side of this wall also registered as dry. This section of the wall was installed after the escape of water incident, so if it was suffering from rising damp, we would have expected the materials to have absorbed some moisture by the time of our visit.
We also noted that the walls in the lounge and dining room have a coat of blackjack applied to the surface of the brickwork. The walls in the lounge also had sand cement render installed, finished with gypsum plaster and paint. However, the walls in the dining room had no cement render where the walls had been exposed.
We noted that the excavated section of the wall at low level beside the leaking mains had two coats of plaster with paint finish in between. This indicates that this section of the brickwork has not been exposed as part of the enabling work before the drying programme was implemented previously.
The Technical Part
We began our moisture survey by recording readings from the relative humidity probes which have been inserted into the walls in the lounge, dining room, and kitchen.
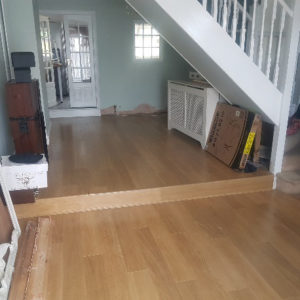
During our inspection, it was also noticed that the new DPM has not been installed under the staircase. This could lead to decay of the timber base of the stairs as the floor in this area is still damp. We suggested that the base of the wooden stairs is removed, along with a section of the old screed under the stairs. If the new DPM is then installed, it will help prevent any issues in the future.
Based on our observations, moisture survey, proximity of affected walls to the leaking water main, no visible evidence of rising damp, and evidence provided by the client, we concluded that the most likely reason why the walls in question have a high moisture content is that the enabling work carried out before previous drying attempts were inadequate. It appears that previous drying phases have only focused on facilitating the drying of the upper sections of the wall.
We are also of the opinion that the drying programme which was implemented was inadequate and not effective. Monitoring methods were subpar; surface readings have been used to sign off the affected walls as dry, without confirming if the readings at depth are also acceptable using much more accurate relative humidity probes or calcium carbide testers.
The client also informed us that the dehumidifier which was installed during the second phase of drying only worked for approximately one week out of the several it was installed for as it had developed a fault.
It also came to our attention that a section of the original quarry tiles which were installed in the kitchen were removed by contractors carrying out the reinstatement work. We also noticed that that there was no visible DPM under the layer of concrete, which indicates that the quarry tiles and bitumen adhesive were acting as the primary DPM on the surface of the floor.
We advised the client that this should be investigated as part of the reinstatement work as the lack of the surface DPM in the section of the floor may lead to debonding of newly laid ceramic tiles over a period of time due to high moisture levels in the slabs beneath.
Based on our findings, we recommended the following work:
Kitchen:
- Protect floor tiles using sheets of correx
- Remove the remaining kitchen units from the party wall and the wall dividing the kitchen and dining room
- Protect the kitchen units with polythene sheeting and store in the lounge while drying takes place
- Strip back the party and dividing walls to brick/blockwork to facilitate drying; vapour barriers are any decorating finish or construction material that will prevent or inhibit the evaporation of moisture. Common vapour barriers include oil-based paint finishes, wallpaper coverings, bitumen, latex-based self-levelling compounds, and ceramic tiles.
Dining Room:
- Protect the flooring using sheets of correx
- Strip back the dividing wall between kitchen and dining room to brickwork
- Strip back the affected right hand side wall to brickwork
- Remove the base of the staircase
- Remove screed to facilitate the installation of the remaining section of DPM
The above enabling work took two technicians one day to complete. The drying process used a combination of adsorption and condensing dehumidifiers and took four weeks to dry the affected areas to acceptable levels.
FREE Estimate
Related Case Studies
-
Flooded Basement Restoration in South West London
A property in south-west London had suffered a flooded basement due to water ingress. It is unknown whether the cause of the ingress was ...
Read Case Study -
Specialist Drying in Twickenham Prep School
The client is an independent prep school for boys aged between 4–13 years of age, based in Twickenham, south-west London. When a fire b...
Read Case Study -
Water Damage Cleanup and Drying in East London
Following an internal leak in an East London flat, we were called to site to assess the damage to the structure, investigate the spread o...
Read Case Study


