
The Brief
Following an internal leak in an East London flat, we were called to site to assess the damage to the structure, investigate the spread of moisture, and determine the most efficient drying methods and flood water extraction following the incident.
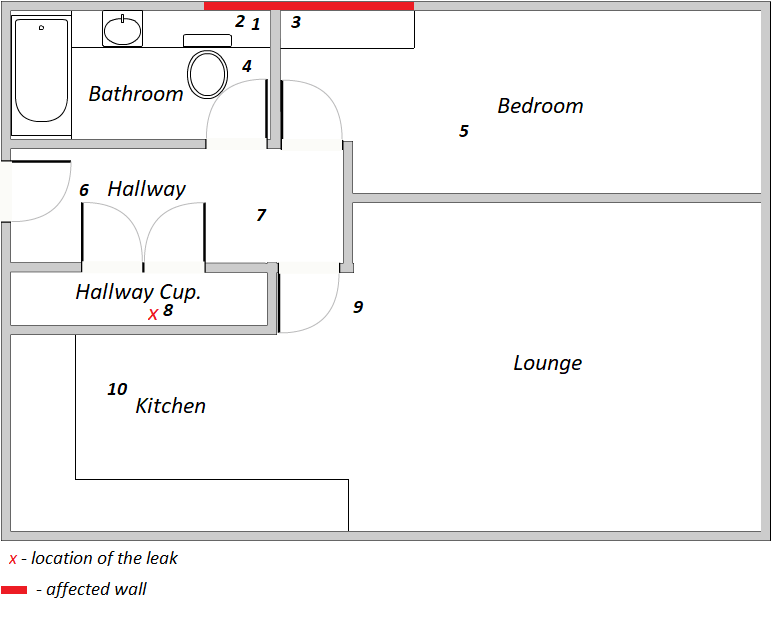
We were advised by the client that there had been an escape of water from one of the connections between the underfloor heating pipe and manifold, which is located in the hallway cupboard. The leak was fixed before we attended site and a leak detection company had confirmed to the client that there were no more leaks in the property.
If the client hadn’t appointed a leak detection company, they could have run the risk of additional leaks. An undetected leak can have serious consequences on a building; significant damage could be caused over time such as substantial mould growth and decaying/rotting building materials and wood.
The Objective – Flood Damage Restoration
The property is a one bedroom flat, situated on the third floor of a modern apartment block. Because of the nature of the leak, there was a risk of damage to the flat beneath, and so our flood damage clean up in London was needed.
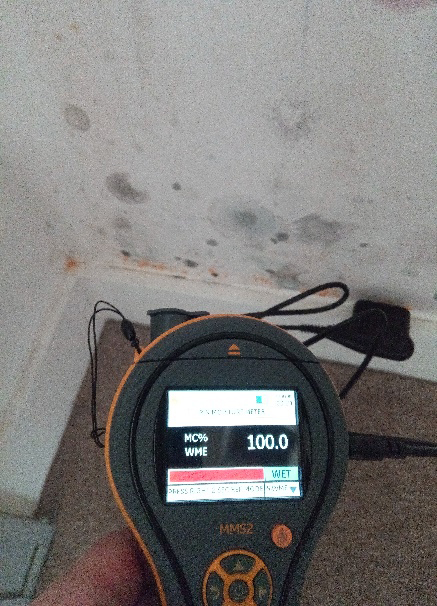
When we arrived on site, we took atmospheric readings. These readings help us to evaluate several things, including whether there is a risk of secondary damage to hygroscopic materials (eg. wood and plasterboard) due to high levels of moisture in the air. Hygroscopic materials can absorb water vapour from the air, increasing the amount of water they’re holding at a given time. As such, this can lead to further issues, including microbial (most commonly mould) growth.
Upon arrival, the atmospheric readings read:
| Area | Relative Humidity | Temperature | Specific Humidity |
|---|---|---|---|
| Internal | 39.4% | 19.7°C | 5.58g/kg |
| Bathroom subfloor void | 89.3% | 19.1°C | 12.42g/kg |
The external walls of the modern London flat are of solid brick construction and dry lined on the inside. The partition walls are constructed from 12.5mm plasterboard on metal stud work frames and finished with paint. Generally, gypsum plasterboard requires replacing following water damage, especially if it has begun to bow, shows signs of mould growth, or if the boards have started to delaminate.
The floors are constructed of 22mm chipboard which is resting on top of wooden battening, and the battening in turn has been laid on top of the precast concrete slab. The property has a water underfloor heating system installed and the underfloor heating pipes within the subfloor void are laid on top of thermal insulation (polystyrene) with plastic membrane beneath; the thermal performance of which can be significantly affected by water damage.
Upon our inspection, we found mould growth forming on the surface of the bedroom party wall dividing flat 311 (the affected property) and the neighbouring flat 309. Standing water was also discovered within the cavity of this wall. The wall cavity in the bathroom was also contaminated with mould.
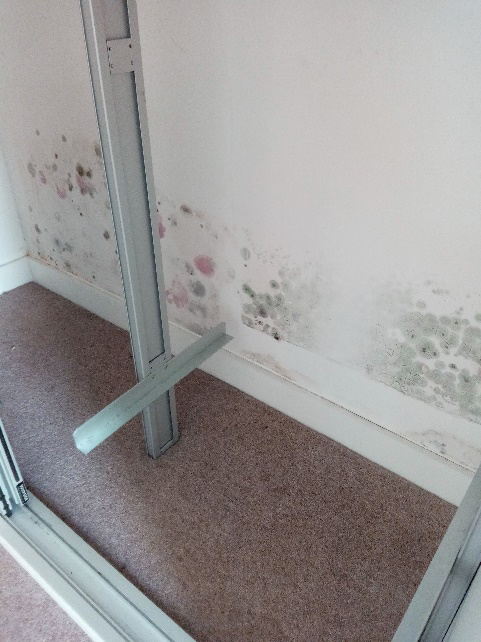
Mould can colonise in as little as 24-48 hours and there are always mould spores floating in the air, which are invisible to the naked eye. These spores can never be eradicated completely but only begin to grow once a spore lands on a moist surface, preferably in a dark place. To colonise, mould needs mould spores, a food source (eg. wood, plaster, cotton), darkness (mould doesn’t usually need sunlight), warmth, and oxygen. Left untreated, mould can cause risks to the health of the occupants of the building, and can start to deteriorate organic building materials, so our flood cleanup and flood water removal was vital.
The Technical Part – Flood Damage Drying
At the time of our visit, the only areas that registered as damp were a section of the party wall, separating flats 311 and 309, and a section of the concrete floor and chipboard behind the bathtub in the bathroom.
The floor in all of the other areas registered as dry. However, due to the construction of the floor, the readings taken from the surface may not be accurate; timber absorbs moisture from the air over time which could have had an impact on the readings.
According to the BS5268-2, the strength of timber is affected by its moisture content, increasing as the moisture content reduces and vice versa. Not only that, but the thickness and width of a piece of timber is predicted to increase by 0.25% for every one per cent increase in moisture content and to shrink by the same amount for every one per cent reduction.
In addition, there is a risk of wood decay and mould growth when the moisture content of wood is too high. The moisture content of the wood will change depending on atmospheric conditions as all wood is hygroscopic (absorbs moisture from the air).
Seventy per cent relative humidity of air at 21°C can be considered as a critical value. When the relative humidity exceeds ninety per cent, wood begins to rot. The moisture content of wood in normal conditions should be around 9.5%, depending on the type of wood and changes in temperature and relative humidity.
Based on the readings we recorded, the moisture content of the chipboard in the bathroom was at around twenty per cent. It was therefore critical that the drying process began as soon as possible to save the floating chipboard floor from rotting.
Due to the construction of the floor, the only alternative to extensive strip out work (the partition walls were built on top of the chipboard floor), was to carry out a specialist flood damage drying service in the form of pressure drying to the affected areas. By using pressure drying, we were also able to target the damp plasterboard ceiling in the flat below.
This process included the use of a mix of turbines, desiccant dehumidifiers, and condensing dehumidifiers. The desiccant dehumidifiers were used to produce heat and extract water vapour in conjunction with the condensing dehumidifiers which condensed the water vapour and channelled it out of the property as liquid water.
Once we had stabilised the environment, we could continue to monitor the drying regime and the materials being dried. However, before the drying could start, we had to establish exactly how far the moisture had spread.
To achieve this, we suggested taking relative humidity and temperature readings from the subfloor void from under the kitchen units. If we established that the moisture had spread as far as the party wall between flats 311 and 313, then the wooden flooring in the kitchen/lounge would have to be uplifted to facilitate the drying process. Uplifting the flooring helps ensure that no trapped moisture is left underneath and commonly, the flooring is also found to be beyond economical repair (BER).
In order to complete the drying regime, we had to:
- Remove the skirting in the hallway, cupboard, and bedroom
- Remove wooden flooring to hallway and uplift carpet and underlay in the bedroom
- Mark spots for drilling with thermal cameras
- Drill 25mm holes in the hallway and the lounge/kitchen chipboard floor to facilitate pressure drying
- Remove contaminated plasterboard
- Remove fitted wardrobes from the bedroom and plinths from kitchen cupboards
- Fit in-depth relative humidity probes into the kitchen floor to measure atmospheric conditions under the floor
We decided that we would attempt to dry the bathroom with the flooring in-situ, by injecting dry air along the partition walls in the hallway and bedroom, and by ducting dry air into the subfloor through the access panel beside the toilet.
Once the above work was complete, we could install multiple positive pressure drying systems. Positive pressure is a condition in which more air is supplied to a space than is exhausted, thus the air pressure within that space is greater than that in the surrounding air. Fresh air is drawn in through HEPA filters and dried to the ambient temperature. This dry air is then released into the affected area and in turn, displaces and dilutes the moisture-laden air, significantly aiding the drying process.
The entire property also required ULV fogging using an antimicrobial solution. This was done before and after the drying was complete.
The strip-out and enabling work took two technicians two days to complete, while the drying regime lasted two weeks to adequately dry the property.
Speak to our restoration experts now
01622 926 505FREE Estimate
Related Case Studies
-
Basement Flood Cleanup in West Malling, Kent
Following a leak from a mains water pipe, three properties in West Malling, Kent, suffered from water ingress into their basements. We we...
Read Case Study -
Flood Damage In London
Ideal Response responds to a major Commercial Flooding Incident for the Universal House Building, London. Shortly after the flooding that...
Read Case Study -
Flooded Basement Restoration in South West London
A property in south-west London had suffered a flooded basement due to water ingress. It is unknown whether the cause of the ingress was ...
Read Case Study


